These days, most of the computers are getting hotter and hotter without any apparent reason. You might have felt that your computer addicts often spin up even when you shut down your computer. If you check your Task Manager, you will know that Windows Modules Installer Worker uses a plenty of disk resources and as well as CPU. However, this belongs to the Windows Operating System and is known as TiWorker.exe. To come out from this trouble, most people often reboot their computers, but this does not solve the problem.
Once in a while, when you are examining the Windows Task Manager, you may observe that this system operation absorbs over half of CPU resources. Whereas in some cases, it leads to a 100% Disk Utilization fault on your computer running on Windows 10.
Consequently, each computer source will be employed, and this has a high chance of making your computer, as well as its applications, function slowly and they may even be forced to stop. Your computer may require a reboot but this won’t be assisting in getting rid of the issue.
So, there are some key methods are mentioned below which are quite helpful.
What is Windows Modules Installer Worker?
Windows Modules Installer Worker is essentially a tool that is built into Windows OS to check for updates. It is also a Windows Update Service that looks for new updates and installs it on your computer. In other words, when your computer’s system checks for Windows update or installs any update, this process would be running automatically. To do this job, Windows Modules Installer Worker high disk usage process runs in the background. Sometimes, it might become unresponsive when checking for updates and fixing bugs.
Windows Module Installer has to be fixed to work high CPU In Windows 10
In case you are troubled by Windows Modules Installer High CPU Usage, five very easy methods can help you to solve this issue and make your system’s performance way better than before.
Method 1: Windows Update to be set “Manual”
To begin with, you have to open the Windows update settings from the control panel and switch from auto-update to manual update. Even after this, the update service is going to start on its own, but switching to manual update mode will turn it off.
Step 1: You need to open the “Run window” – Press the Windows key and R key together to launch the ‘RUN’ window.
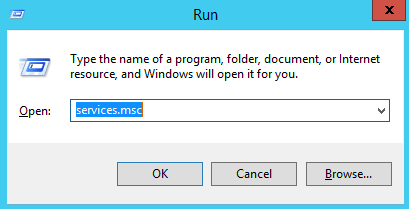
Step 2: Look for the “services.msc” from the search option. Once you find it, press the “enter” button.
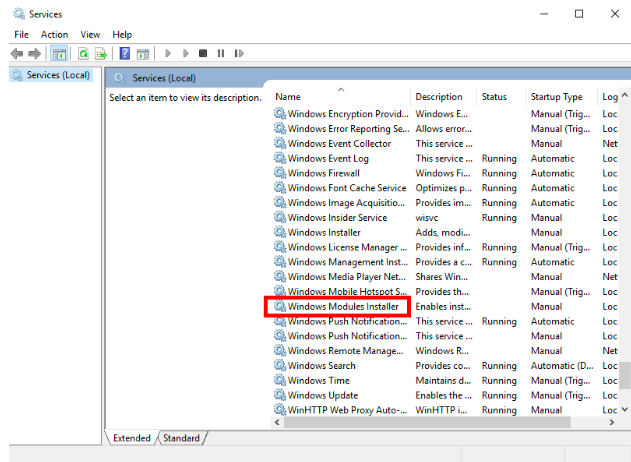
Step 3: Locate “WMI” in the list of services, double click on the option “Windows Modules Installer” to open it.
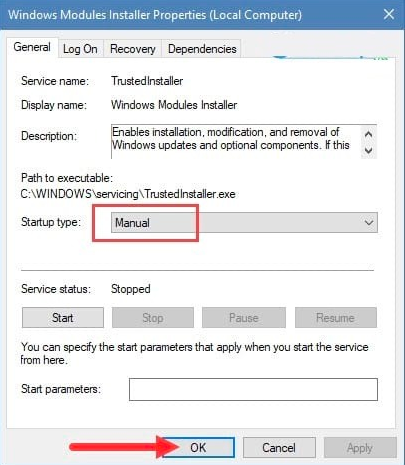
Step 4: Choose Manual settings- a menu will be appearing from the Startup Type menu, here you have to choose the manual option. If the program shows it’s already running, you have to click on ‘Stop’. Look at the given image for further assistance.
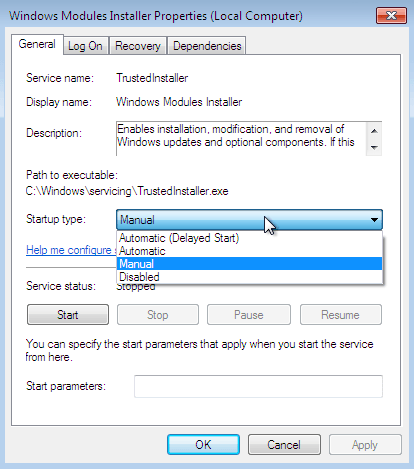
Step 5: Click on Apply – This is the last step to finish your setup, just click on Apply and then on the OK button to save your settings.
Method 2: Fixing “Tiworker.exe”
Even though you have changed your system’s auto-update setting to manual update and still the task manager shows that there is high CPU usage, you may face many unwanted problems. Here, this issue might be arising from Tiworker.exe in Windows Modules Installer. Windows update is also associated with this executable file so, following a few quick steps can help you get rid of this issue:
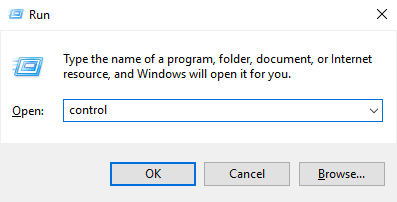
Step 1: Launch Ru Window – Open Run window by pressing both Windows and R key together and side-by-side the open control panel by entering “Control”.
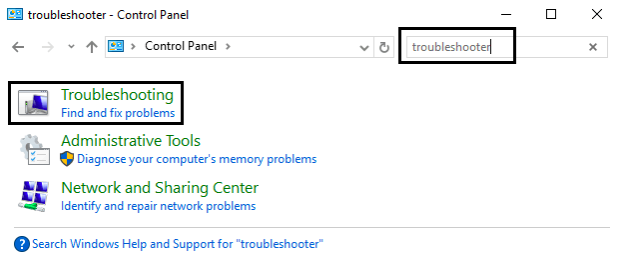
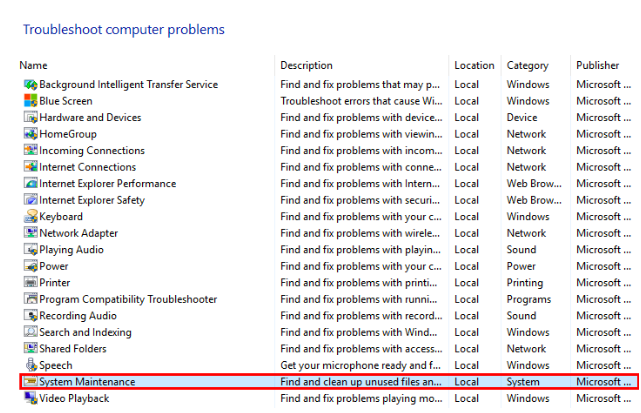
Step 2: Launch ”System Maintenance” and allow the System Maintenance Troubleshooter to function.
Step 3: Wait for the Troubleshooter to repair Windows Module Installer.
Step 4: Have patience till Troubleshooter has fixed Windows Modules Installer – In this step, you need to wait until the Troubleshooter is done with fixing issues regarding high CPU usage in the Windows Modules Installer. If this does not solve the issue, you have to run “System Performance Troubleshooter”.
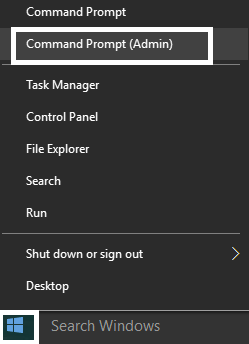
Step 5: Launch Command Prompt- To launch a command prompt, you need to press both the Windows key and X key together and then run the Command Prompt under Administration.
Step 6: As the command prompt window appears, type “ Msdt.exe/id PerformanceDiagnostic”.
Step 7: Following the above-given instructions, now you have to launch the Troubleshooter and wait for the issues to get fixed.

Method 3: System File Checker Tool has to be used for scrutinizing and fixing falsified System Folder
Even if one or more than one system folders based on Windows Update are found to be corrupt, your PC may face high resource utilization issues.
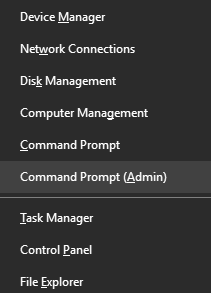
Step 1: For getting started, you need to press Windows + X to put the context menu forward, and then choose the “Command Prompt or (Admin)” alternative to start the Command Prompt as an admin user.
Step 2: Type the command “SFC/scannow” in the command prompt window. This command will start looking for some damaged or missing files that need to be repaired.
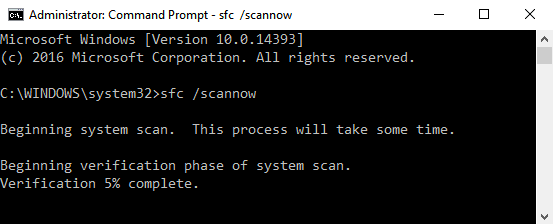
Step 3: Once the entire process is completed, you need to restart your computer.
Step 4: Now check if your computer is performing faster than earlier or not.
Method 4: Find and Fix Windows Corruptions using the tool DISM
DISM tool, also known as the System Update Readiness Tool is designed to help the users to scan for corrupt files in the entire Windows Operating System and fix the issue automatically. Follow the steps given below to fix your computer using the DISM tool.
Step 1: Open Command Prompt.
Step 2: Here you have to run these commands:

Dism.exe/Online/Cleanup-image/Restorehealth
Or
Dism/Online/Cleanup-image/Restorehealth
Step 3: Wait until the DISM tool scans your entire computer for any existing corruption and resolves it.
Step 4: Then turn on your PC and recheck if the problem of high computer resource usage that was created by the Windows Modules Installer Worker operations has been resolved or not.
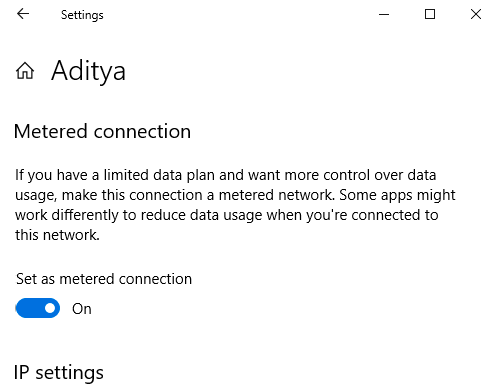
Method 5: Change your Wi-Fi setting as Metered Connection
Even this method has proved to be helpful at times. Follow the given steps to fix your issue with this method:
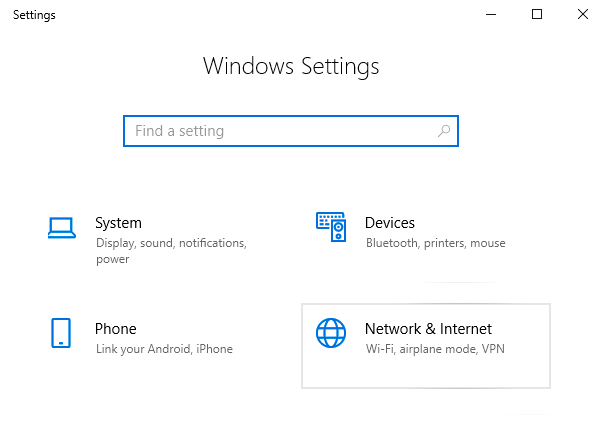
Step 1: Open “Setting” and click on Network and Internet.
Step 2: Click on your Wi-Fi network that is currently connected to your computer.
Step 3: In this step, you have to change your Wi-Fi setting to a metered connection.
Step 4: To save the changes, now restart your computer.
Can Windows Module Installer Worker be disabled in Windows 10?
Many queries regarding the chances of disabling Windows Module Installer have come up from the users of Windows 10, some possible methods which are capable of helping you out are given here.
The Software Distribution folder has to be deleted
By default, Windows downloads and keeps fresh updates in the folder of Software Distribution. Many times, the files that have been downloaded can get corrupted and might lead to an increased usage of CPU because of constant update checks. A major way of fixing this issue is to eliminate the folder of Software Distribution and restore the Windows update. The steps to do it are as follows:
Windows Update Service has to be stopped
First, the Windows update service has to be stopped by the Services interface to prevent receiving any error when you delete the Software Distribution file.
Step 1: To open Run, Windows Key + R has to be pressed.
Step 2: Search services.MSC and press enter.
Step 3: Go to the Service window and find Windows Update service.
Step 4: As soon as you discover the box showing Windows update service use the right-click button and choose the stop command.
Now, shut off the Windows Services window and stick to the steps mentioned below to discard the folder of Software Distribution.
Delete Software Distribution folder
Step 1: Initially launch “File Explorer” and visit the succeeding directory entitled as C:-> Windows
Step 2: Find the Software Distribution file. Then, use the right-click button and you will see the appearance of a drop-box from which you need to choose the delete option.
Afterward, you have to restart your computer system and check if there are updates available. To do this you must choose Settings then, Update and Security then, Windows update, and lastly click on the Check for update option.
Run Windows Troubleshooter
If you have already chosen to update Windows automatically, give the manual setting a try. Many users have claimed that changing the update mode to manual helps largely in solving the issue of high CPU usage. It can be done by following the steps given below:
Step 1: Right-click the Start option and choose Settings.
Step 2: Choose Security and Update and double click the tab showing Troubleshoot.i
Step 3: You have to navigate downwards and choose Windows Update. You can find this option beneath the Troubleshoot segment.
Step 4: Now, select the “Run the Troubleshooter” option and you would discover the system getting automatically scanned by the Windows update. It would look for errors regarding Windows update and then the diagnostic would be commenced.
Step 5: The directions mentioned on the screen must be followed to use and suggest an outcome.
Once you are done succeeding with these steps, you need to reset your system and examine whether the issue concerning the utilization of high disk is resolved or not.
Stop Windows automatic updates
If you have already chosen to update Windows automatically, give the manual setting a try. Many users have claimed that changing the update mode to manual helps largely in solving the issue of high CPU usage. It can be done by following the steps given below:
Step 1: Click on the rightbutton of your mouse and choose the Select command.
Step 2: Launch the Network and Internet icon.
Step 3: Choose the Wi-Fi tab.
Step 4: Select the present Wi-Fi network that is working around you.
Step 5: Navigate downwards until you find the “Metered Connection” option.
Step 6: At last, select the option “Set as metered connection” alternative for your Wi-Fi network.
While you are on any measured connection, Windows 10 fails to download and install updates through the network, and that could be of great help to you in fixing the high-level CPU usage issue. Although, this option can only be availed when you are under any Wi-Fi network with the help of a router or hotspot.
Read more: https://vshare.eu/pair error fix
Frequently Asked Questions (FAQs) Regarding Windows Modules Installer Worker High CPU Usage
1. Define Windows modules installer worker?
It is one of the processes in the Windows system which is known for its high CPU usage. Its work is related to Windows updates and plays a major role in updating Windows.
2. What is the job of a Windows modules installer?
This option can help you in checking for new updates from the Windows server. This option also helps in installing them into your PC. In short, this option is very useful in automatically update Windows.
3. Is it possible to stop the Windows modules installer worker?
It is recommended not to stop Windows modules, installer workers. You can temporarily disable it when your system slows down for a long duration of time. You can disable it even when there is a problem of high disk usage, which generally affects your normal work.
3. What does Windows Module Installer uses more CPU?
This is natural in Windows 10 to use more CPU from the Windows Modules Installer Worker. Besides, the good thing is that you can let it run as it will finish and then stop utilizing the disk resources and CPU.
4. Can the Windows Module Installer be considered as malware?
As of now, there are no reported cases regarding malware being discovered in the Windows Module Installer Programmer. Still, if you doubt the occurrence of any malware in the system the most reliable option is to scrutinize your system with the help of antivirus software of your choice to see whether anything is missed out.
5. Why Windows 10 version of Windows Modules Installer Worker always running?
Windows Modules Installer Worker is one of the most ordinary systems that make use of the resources on your computer. It is also known as TiWorker.exe – WMI Worker. The Windows 10 version of Windows Modules Installer Worker assists you to avail updates for your computer automatically.
Read more: 7 Methods to Solve: Discord Mic Not Working [Detailed Steps]
Conclusion
This is the method with the help of which you can solve the issue of Windows Modules Installer Worker excessive CPU usage fruitfully. The quick fix methods discussed above are going to be highly assistive in solving every issue you have to deal with in your Windows system which is considered the outcomes of installing Windows Modules Installer Worker. Choosing to disable the service of Windows update would be effective in putting an end to all your problems in a very short period. However, if you choose to do the same, you wouldn’t be able to use the update check features and installation of a new feature. You will also be obstructed from bug fixes or any up-gradation in your PC.

